Menu and Info Bars
This page is outdated.
Menu
The Menu Bar is located at the top left of the editor.
File
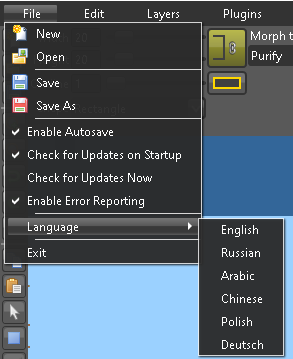
The file menu has your usual file related functions; New, Open, Save, Save As, and Exit. Some of these functions are also on the Toolbar and have Shortcuts and Keybindings.

New Function
The New function creates a new .wld file. You have the option to name the world, select the seed (it is selected at random each time you use the New function), the height and width of the map, and the depth at which the surface and cavern levels start.
The seed is not used at the current time but will likely in the future be used for map generation (rather than the bland map that is currently created). The height and width simply determine how big your world is. Surface level is the height at which 0ft is determined, this being important for plant related properties and creatures. Bedrock level is the height at which the dirt background changes into the stony background and carries with it related properties as well.
Currently the New function is most useful if you are going to completely customize your map - it is synonymous of a blank canvas. However, it can also be helpful with troubleshooting as the new map will be of the same version as TEdit which may differ to a new map created in Terraria itself.
Other Functions
Open is like it sounds - it opens a map to edit. You can open .wld, .bak, and .TEdit files. The .wld files Terraria creates are located in your My Documents/My Games/Terraria folder (if using Windows).
Save saves the changes you have made (if any). If you do not have the autosave option enabled make sure to regularly save your map.
Save As is a more specialized save function that allows you to save as a different file, useful for making different versions of the same map.
Enable Autosave is as it sounds; it turns on the autosave option. The editor should automatically save every so often, like every 5 minutes or something similar.
On Startup Check Updates does what it says (it checks for updates on startup...), while the Check For Updates option can be used to manually check for updates.
Exit quits the program.
Edit
The Edit menu is full of basic functions like Undo, Redo, Copy, Paste, Delete. These functions are also on the toolbar and have shortcuts.
Undo reverts last change you made (or the last redo). The undo function can be used multiple times in a row to revert multiple changes. Useful.
Redo reverts the undo.
Copy temporarily saves the selection you have (using the Selection Tool) to the Clipboard. You can then paste from the clipboard or using the paste function. You can make a permanent copy by exporting the selection as a schematic to use in other maps or even to send
Layers
Plugins
Help
Info Bar
Starting from the left, the Information Bar comprises of the Position Box, the Tile Box, the Wall Box, the Extra Box, and the Frame Box.
Position Box
This box gives information on the current position of the cursor on the map. The first number is the x-axis co-ordinate and the second number is the y-axis co-ordinate. The top-left is 0,0.
Tile Box
The Tile Box gives you information on which tile type is located underneath the cursor.
Wall Box
The Wall Box gives you information on which wall type is located underneath the cursor.
Extra box
The Extra Box gives you information on whether there is a liquid and/or wire located underneath the cursor. The number next to a liquid is the amount of liquid in that block, where 255 represents a full block of liquid.
Frame Box
The Frame Box gives information about the framing of the tile beneath the cursor. This is useful for the developers but not so much for the users of the editor.
Paint Color Box
The Paint Color Box shows the paint colors of the tile or wall under the cursor.
Selection Box
The selection box shows the size of the current marquee selection. If the box is highlighted yellow, the selection is active and editing can only be done inside the selection. You may also copy the contents of the selection to the clipboard with ctrl+c